Project Breakdown: Wrought Iron Fence Generator
I’ve had on my TODO list for quite some time a task to create a basic fence generator in Houdini. This is a classic use for Houdini in a gamedev context, because the input shapes (both the path of the fence and the terrain that the fence sits on) are likely to change often during the creation of a game level. Proceduralism can help artists and level designers quickly make changes that would otherwise require tedious repositioning of fence pieces anytime the level layout needs changing.
Preliminary Research
I spent some time looking at various reference images for wrought iron fences. One thing that I noticed fairly quickly is that if the fence has a lot of ornate details on it, then most likely the fence pickets are put together in prefabricated segments that do not slant whatsoever. For fences on a slope, these segments are then staggered at various intervals in order to accommodate the slant of the landscape. This turns out to be fortunate for me, because the “realistic” construction of the fence also happens to be much easier to implement digitally compared to if each fence section needed to dynamically adjust itself based on the slope.
For the style of fence I wanted to create, I identified 3 main components:
-
Posts: These are the main columns that the fence sections attach to. The spacing between these is very important, because the rest of the components will have to conform to it either by duplication or by stretching.
-
Pickets: The pickets are the main “fence” and are comprised of prefabricated sections combining the spears, rails, and other decorations.
-
Base
- Trim: The trim sits under the pickets and elevates them off the ground.
- Foundation: The foundation is a gap filler to account for the fact that the staggered shape of the fence produces triangular empty spaces when the trim is significantly above the landscape.
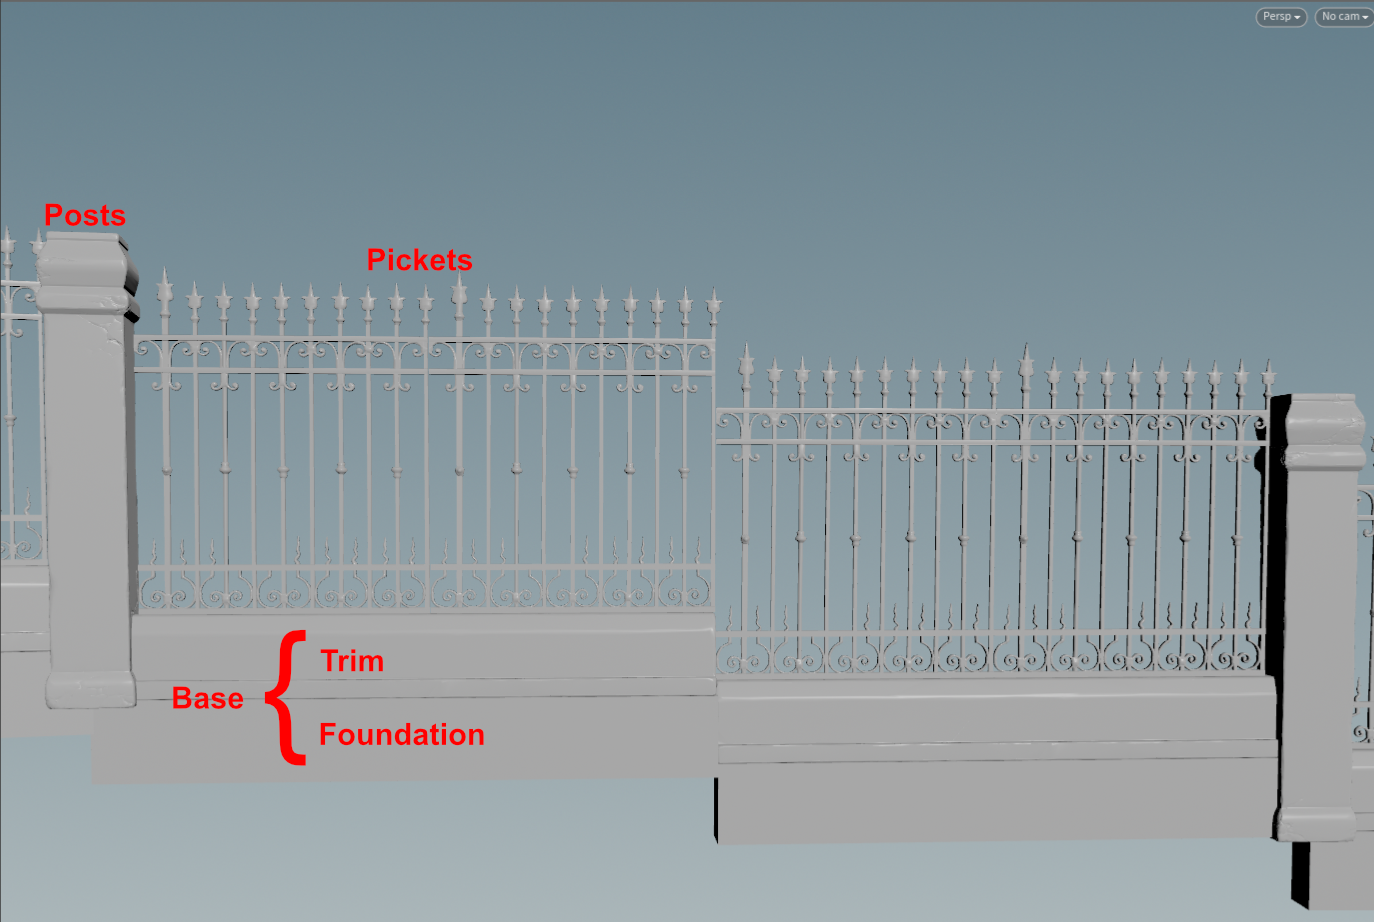
I originally wanted to generate everything from scratch, but in the interest of time, I opted to use some premade Unreal marketplace assets for the posts, pickets, and trim. In hindsight, I’m actually pretty glad I went for this approach, because I think that the fidelity of the fence components (especially the pickets) can be pushed much further in a shorter amount of time when they are handmade (or photo-scanned). As it turned out, there were still plenty of interesting problems to solve, even when using prefabricated pieces.
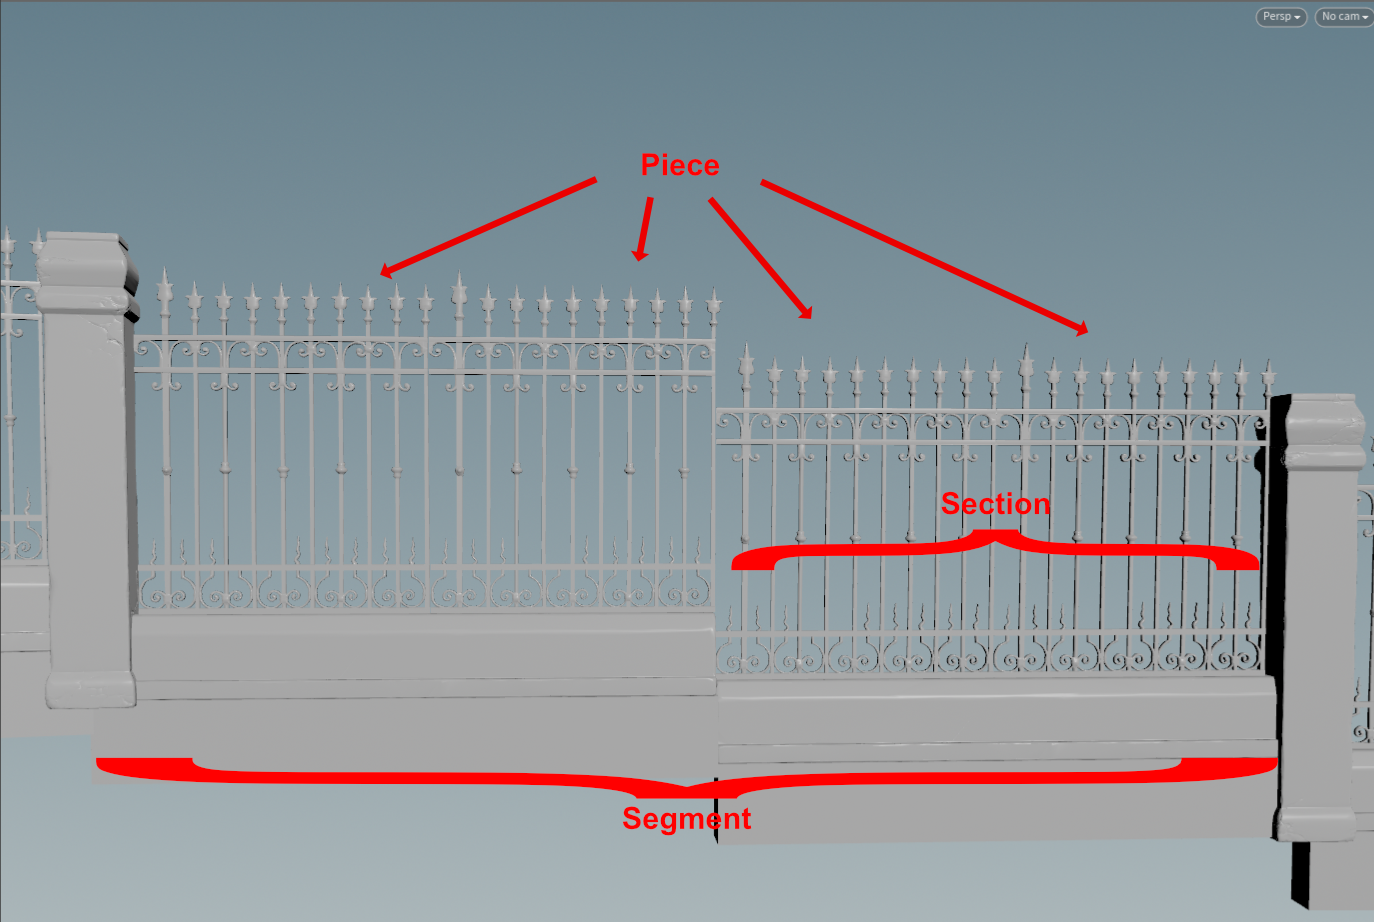
I also had to come up with some terminology for the different parts of the fence within the context of the stagger computation. I’m including these here so when I make reference to them below, you’ll know which part I’m talking about.
Tool Structure
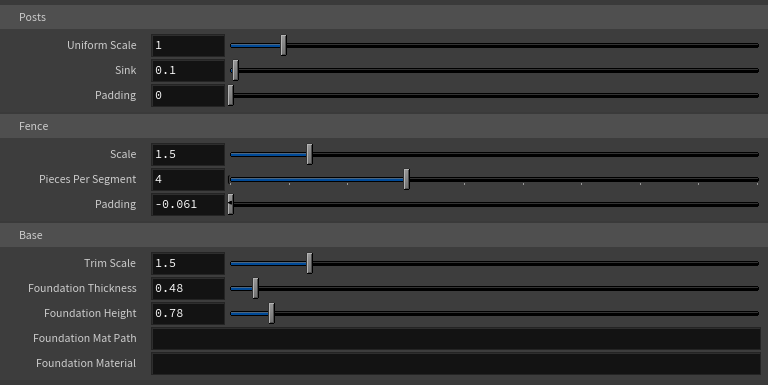
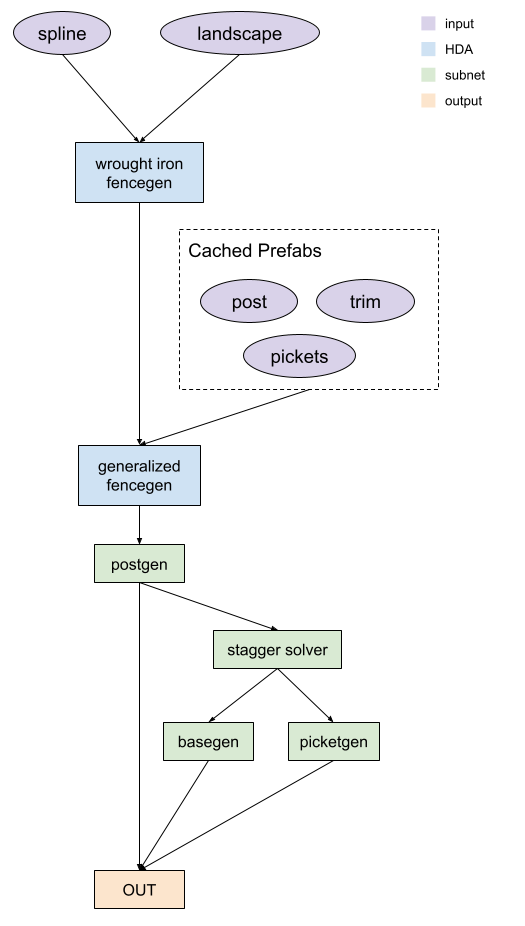
The wrought iron fencegen tool is actually just a wrapper for a generalized fence generator tool. Structuring the tool in this way lets me have much more fine grained control under the hood without exposing all those controls to the end user. It also allows me to imbed the prefabricated fence pieces directly into the top-level tool, so that people don’t have to perform the repetitive action of including them as inputs every time they want to make this particular type of fence.
top level controls:
The internal fence generator includes subnets for placing the posts, base, and pickets. Additionally there is a stagger solver which helps transform the spline from a smooth curve into the stagger shape.
Implementation
Post Generator
With the post generator, I think the most interesting part to highlight is probably how the spline is processed. As I mentioned earlier, the spacing between the posts is very important, because the rest of the geometry has to fit between the posts. In order to compute the spacing between each post, I take the x-length of the pickets prefab bounding box and then multiply it by the top-level tool parameter “Pieces Per Segment”. I also add the padding for both the posts and pickets, which will create extra space on either side of the posts and in between each picket section respectively.
// inside attribute wrangle
vector bbox_pickets = getbbox_size(1);
float bbox_pickets_x = bbox_pickets[0];

vector bbox_post = getbbox_size(2);
float bbox_post_x = bbox_post[0];

if (nprimitives(1) > 0)
{
    i@pieces_per_segment = chi("pieces_per_segment");
    float pieces_length = bbox_pickets_x * i@pieces_per_segment;
    pieces_length += ch("piece_padding") * i@pieces_per_segment;
    @post_length = bbox_post_x + ch("padding");
    @segment_length = pieces_length + @post_length;
}
else
{
    @segment_length = ch("spacing");
}

Once the segment length has been computed, I then use a resample node to slice up the spline into equal length segments. I opted for equal length segments because this is the simplest option; however, in the future I may explore having a more dynamic length system where segments can be comprised of a variable number of sections/pieces.
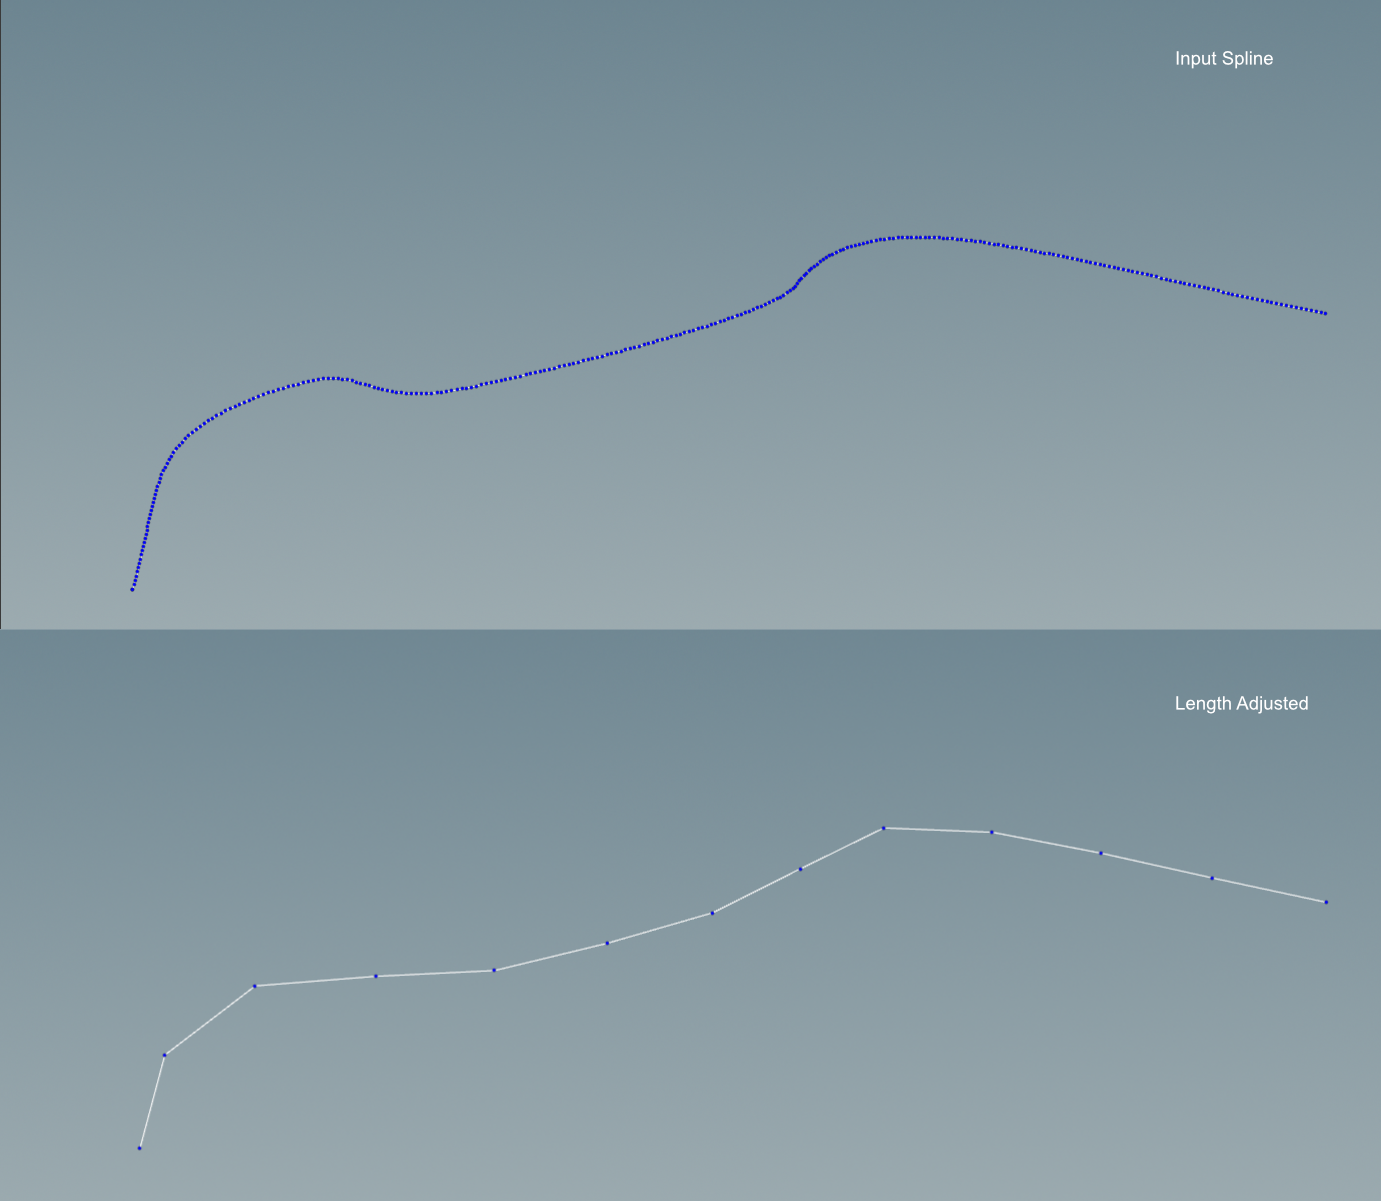
Finally, I use the ray node to fit the spline onto the landscape. Originally, I was using the default minimum-distance setting on the raycast, but I found that the resulting points end up not preserving the horizontal spacing between them because the minimum distance point on the heightfield is not necessarily in a straight vertical line from the spline. My fix for this was to evaluate the highest point of the heightfield, place the entire spline above that point, and then to do a “project rays” raycast pointing straight down.
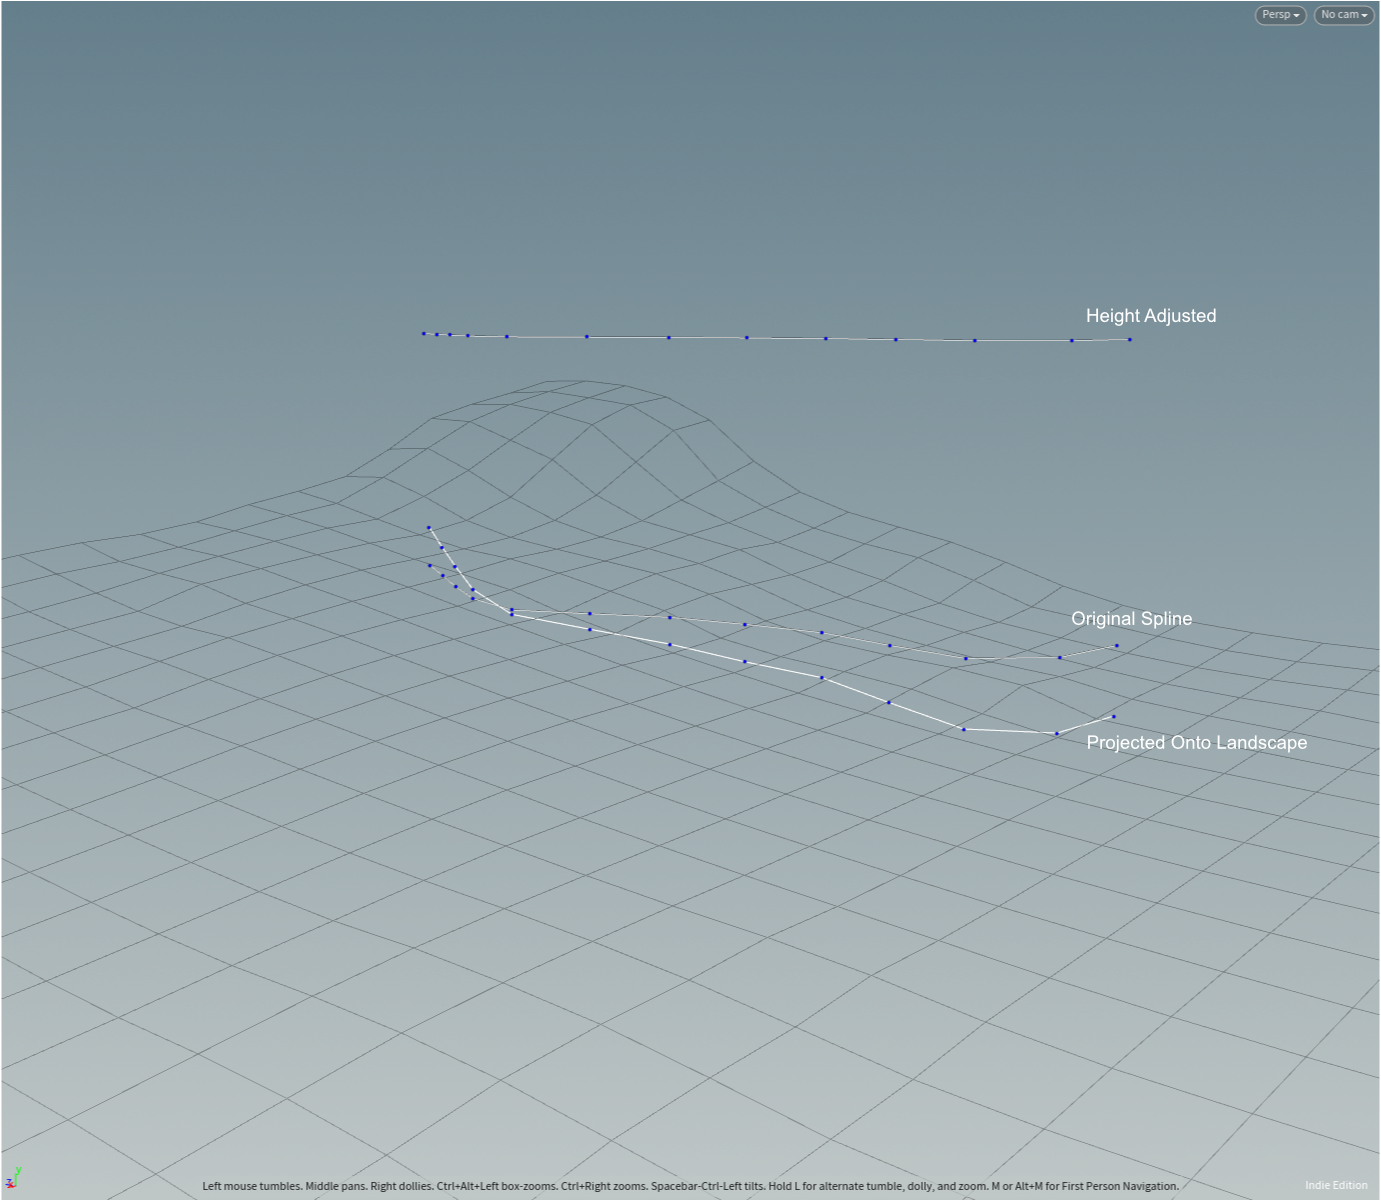
One thing I am still unsure of is what the best way to compute the highest point of a heightfield is. I feel like there should be some way to do it from a volume wrangle node, but after a few failed attempts at this, I just gave up and opted for converting the heightfield into polygons and to then grabbing the max point position from that. I don’t particularly like this approach because converting from voxels to polygons can be quite a heavy operation. To compensate for this, I ended up turning the density on the convert heightfield node pretty low (to a value of .1). Ultimately, I think this should be fine, but I still would have preferred to just get the max voxel position or something if I could have figured out how to do so.
The posts are populated using a copy to points node with instancing enabled (see more about instancing in the “Performance Considerations” section). In order to give the posts some visual breakup, they are given pseudo-random orientations at 90° increments. I say “pseudo-random” because I made a slight tweak so that if post N has a particular rotation, post N+1 is guaranteed to have a different rotation.
Stagger Solver
The stagger solver is responsible for a few different things:
- Slicing up the spline into segments
- Separating the post padding from the main segments
- Deciding how many sections to include based on the slope of the spline segment
Slicing up the spline
Anytime you need to slice up a polygon curve, the carve node is the way to go. Use the following settings to slice up a shape so that every edge is its own primitive:
- First U: 0
- Second U: 1
- Breakpoints->Cut at all internal U Breakpoints
- Cut->Keep Inside
Post padding
For the post padding, I use another carve node, this time in “divisions” mode:
- First U: segment_pad_percentage
- Second U: 1 - segment_pad_percentage
- U Divisions: 2
- Cut: both keep inside and keep outside enabled
segement_pad_percentage is simply the ratio between the padding length and the total length of the segment. The pad primitives can be isolated by looking at the prim number modulo 3:
int prim_index = @primnum;

if (prim_index % 3 == 0)
{
    setprimgroup(0, "lhs", prim_index, 1);
    setprimgroup(0, "padding", prim_index, 1);
}
else if (prim_index % 3 == 2)
{
    setprimgroup(0, "rhs", prim_index, 1);
    setprimgroup(0, "padding", prim_index, 1);
}
Stagger computation
For the stagger computation, I essentially needed a function that takes in the slope as an input and outputs the number of times the fence segment should be sliced up into smaller fence sections. I opted for using a “slope threshold” parameter and dividing the actual slope angle by that number. This gives you a target number of sections. So for example, if the slope threshold is 5°, then a slope of 10° would result in 2 segments. For calculating the slope angle itself, I leveraged the geometric definition of the dot product, which allows me to find the angle between two normalized vectors (they don’t have to be normalized, but it simplifies the math slightly).
vector start_point = point(0, "P", 0);
vector end_point = point(0, "P", 1);

vector direction_vector = end_point - start_point;
vector flat_vector = direction_vector;
flat_vector[1] = 0;

direction_vector = normalize(direction_vector);
flat_vector = normalize(flat_vector);

float radians = acos(dot(direction_vector, flat_vector));
@slope_angle = degrees(radians);

float slope_threshold = ch("slope_threshold");
int sections = 1;

if (slope_threshold > 0)
{
    sections = max(1, int(rint(@slope_angle / slope_threshold)));
}
One problem with this approach is deciding what to do when the number of pieces per segment is not nicely divisible by this resulting section count. My solution was to perform a search for the nearest valid section count.
i@raw_section_count = sections;
int pieces_per_segment = chi("pieces_per_segment");

// Search for the nearest section count that pieces_per_segment is
// divisible by. This algo gets slower the larger pieces_per_segment
// is, but pieces_per_segment should always be relatively small.
for (int dist = 0; dist < sections; dist++)
{
    if (pieces_per_segment % (sections + dist) == 0)
    {
        sections += dist;
        break;
    }
    else if (pieces_per_segment % (sections - dist) == 0)
    {
        sections -= dist;
        break;
    }
}

i@section_count = sections;
i@pieces_per_section = pieces_per_segment / i@section_count;
Once the section count has been computed, staggering the spline is just a matter of using resample to set the number of sections in each segment, carve separate out the segments, resample again to set the number of pieces per section, and then finally some Vex code to make sure that each point in a section has the same y position as the first point in the section.
Base and Picket Generator
Since this project is using prefabricated geometry for the trim and the pickets, there isn’t too much to say about the base and picket generators. They both use the copy to points node to arrange the pieces along the staggered spline. At this stage, the only points on the spline that matter are the starting points on each disconnected piece. These can be isolated using a grouprange node followed by a blast node.
Since the pickets are the most visually interesting part of the entire fence, I opted to not include any controls for stretching them. Instead, pickets can only be scaled uniformly, which will cause the section length to expand.
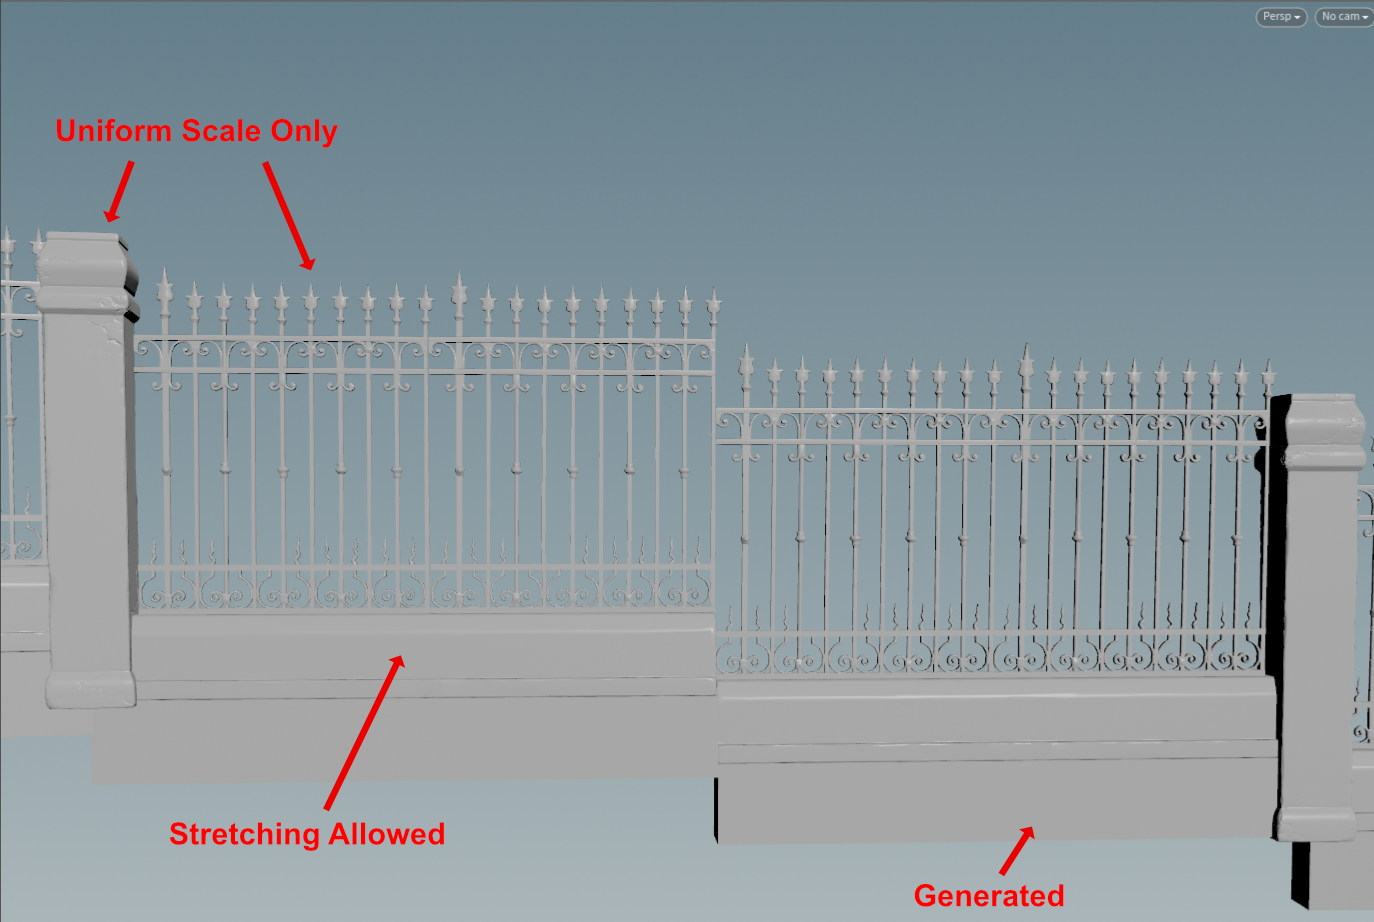
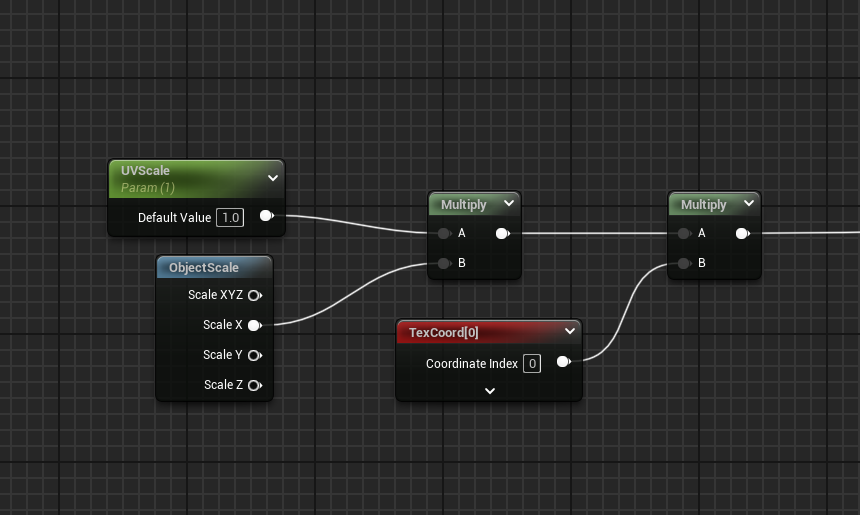
For the trim, the asset I chose has a material that uses an interesting strategy: it scales the UVs uniformly by the x scale of the mesh. It doesn’t work perfectly, but it gives you a cheap way of maintaining a decent looking texture when scaling the mesh on its long side.
Performance Considerations
When it comes to optimization, I first went for the low hanging fruit: instancing. Since this tool makes use of prefabricated pieces, converting these pieces to instanced static meshes is an easy performance win. ISMs allow Unreal Engine to bundle identical actors together into a single draw call, which can vastly improve memory usage. ISMs can also reduce CPU overhead because they reduce the number of actors in the scene. One super nice thing about using Houdini is that if you enable the “pack and instance” feature on the copy to points node, HoudiniEngine will automatically convert the mesh actors it produces into ISMs. For this tool, each main component (posts, pickets, trim, foundation) is converted into a separate ISM. For the trim and the foundation pieces, an added wrinkle is that they are actually slightly longer for the sections that are adjacent to the posts, and shorter for the middle sections. In order to support this, the base generator groups the sections together by length and then runs copy to points once for each group.
Another optimization I’m using is Nanite meshes. Nanite is Unreal Engine’s automatic LOD system that dynamically scales the number of triangles in a mesh. This leads to a whole host of benefits as the GPU doesn’t have to work as hard when the mesh’s tri count is reduced as the camera moves away from the object. Also note that the usage of Nanite does somewhat reduce the benefit of also doing instancing, since Nanite also reduces the number of draw calls by grouping objects that use the same material into shading bins.
Another performance consideration is the materials themselves. UE marketplace assets often come with 4K textures, which might seem nice at first, but can quickly blow through your memory budget if everything in your scene is 4K. For this project, I did not make any adjustments to the textures on my marketplace assets, but a couple of options that are available if profiling reveals that texture sizes are causing decreased performance:
- Use LOD bias: In the UE texture asset editor, you can use this setting to force a texture to have a maximum mip value that is lower resolution than the imported texture asset resolution.
- Use Streaming Virtual Textures (SVTs): Streaming virtual textures work by splitting up your mipmaps into smaller chunks and then dynamically loading those chunks based on what is actually visible on the screen. This lets you have a mesh where the most visible parts have higher resolution and the less visible parts have lower resolution.
The material I created for the foundation geometry also uses triplanar projection, which can be quite heavy since it triples the number of texture samples you need. This is something I may choose to optimize in the future.
Lessons Learned
One thing this project taught me is that it is very easy to fall into the trap of trying to generalize a tool too early. When I started the fence project, I opted for creating a very general fence generator that could support many different styles of fences. This lead me to creating a tool that had a ton of controls and was not particularly artist friendly. I ended up creating a wrapper around that tool to support the very specific use-case of this composite iron fence + stone foundation fence.
This strategy for construction procedural tools really appeals to me. If you need to build a generator for something- by all means, go ahead and build the generalized representation of that tool, but don’t expose it as the final tool. Instead, create a wrapper around that complex tool that only exposes a handful of values that actually matter to people. This is great because it gives people a tool that is simple and easy to use, but it also takes the pressure off of you to create a something that immediately supports every use case. You can leave parts of the internal generator “under construction” while still supporting the use-case you have at hand. And unlike just building a hyper niche tool that fits the exact current use-case, you are still building a more general tool under the hood with future flexibility in mind.